Agent Profiles
Configure specialized AI agent profiles with custom prompts, tools, and actions
The agents extension allows you to configure specialized AI agent profiles within your environment. Each agent is defined as a profile that can have its own system prompt, default LLM model, UI theme, allowed tools, allowed skills, default avatar, and custom footer action buttons.
Agent Profile Storage Directories
Agents are parsed from directory profiles. The application searches for agent profiles in the following order:
-
User-Specific Custom Profiles:
~/.llms/user/<user>/profiles(e.g.~/.llms/user/<user>/profiles/assistant) -
Default User Profiles: Additional agent profiles can be added for all users in the
~/.llms/user/defaultdirectory. -
Built-in Agent Profiles: llms/extensions/agents/profiles - Includes default profiles like chat and planner
Overriding Built-in Profiles
To override a built-in profile, create a new profile with the same name in either the user-specific or default user profiles directory. For example, to override the built-in chat profile, create a new chat profile in ~/.llms/user/default/profiles/chat where the application will load your custom profile instead of the built-in one.
Disable built-in profiles
To disable loading of built-in profiles, set enabled: false in a custom profile of the same name. For example, to disable the built-in chat profile, create a new chat profile in your user directory with the following config.json:
{
  "enabled": false
}
List of Agent Profiles
The application lists all available agent profiles in the Agent Profile Selector dropdown, which is accessible when creating a new conversation thread or from the chat header of an active thread.
Built-in Profiles
- Chat: A general-purpose assistant designed for open-ended conversations and versatile tasks.
- Planner: A strategic agent optimized for multi-step reasoning, task decomposition, and execution planning.
- Coder: An agent specialized in analyzing and implementing code, ideal for software development tasks.
Planner → Coder Workflow
A common and effective pattern is to use the Planner and Coder profiles together in a two-phase workflow:
-
Plan - Open a new thread with the Planner profile and describe what you want to build. The Planner will break the goal down into a structured architecture plan. You can then click Save to PLAN.md to persist the plan to your working directory, or Execute Plan to hand it directly to the Coder without saving.
-
Implement - Once the plan is ready, click Execute PLAN.md (or Execute Plan) to switch to the Coder profile. The Coder reads the plan and implements it step by step, writing the actual code to disk.
This separation keeps planning and implementation concerns distinct — the Planner focuses on what to build and how to structure it, while the Coder focuses on writing the code.
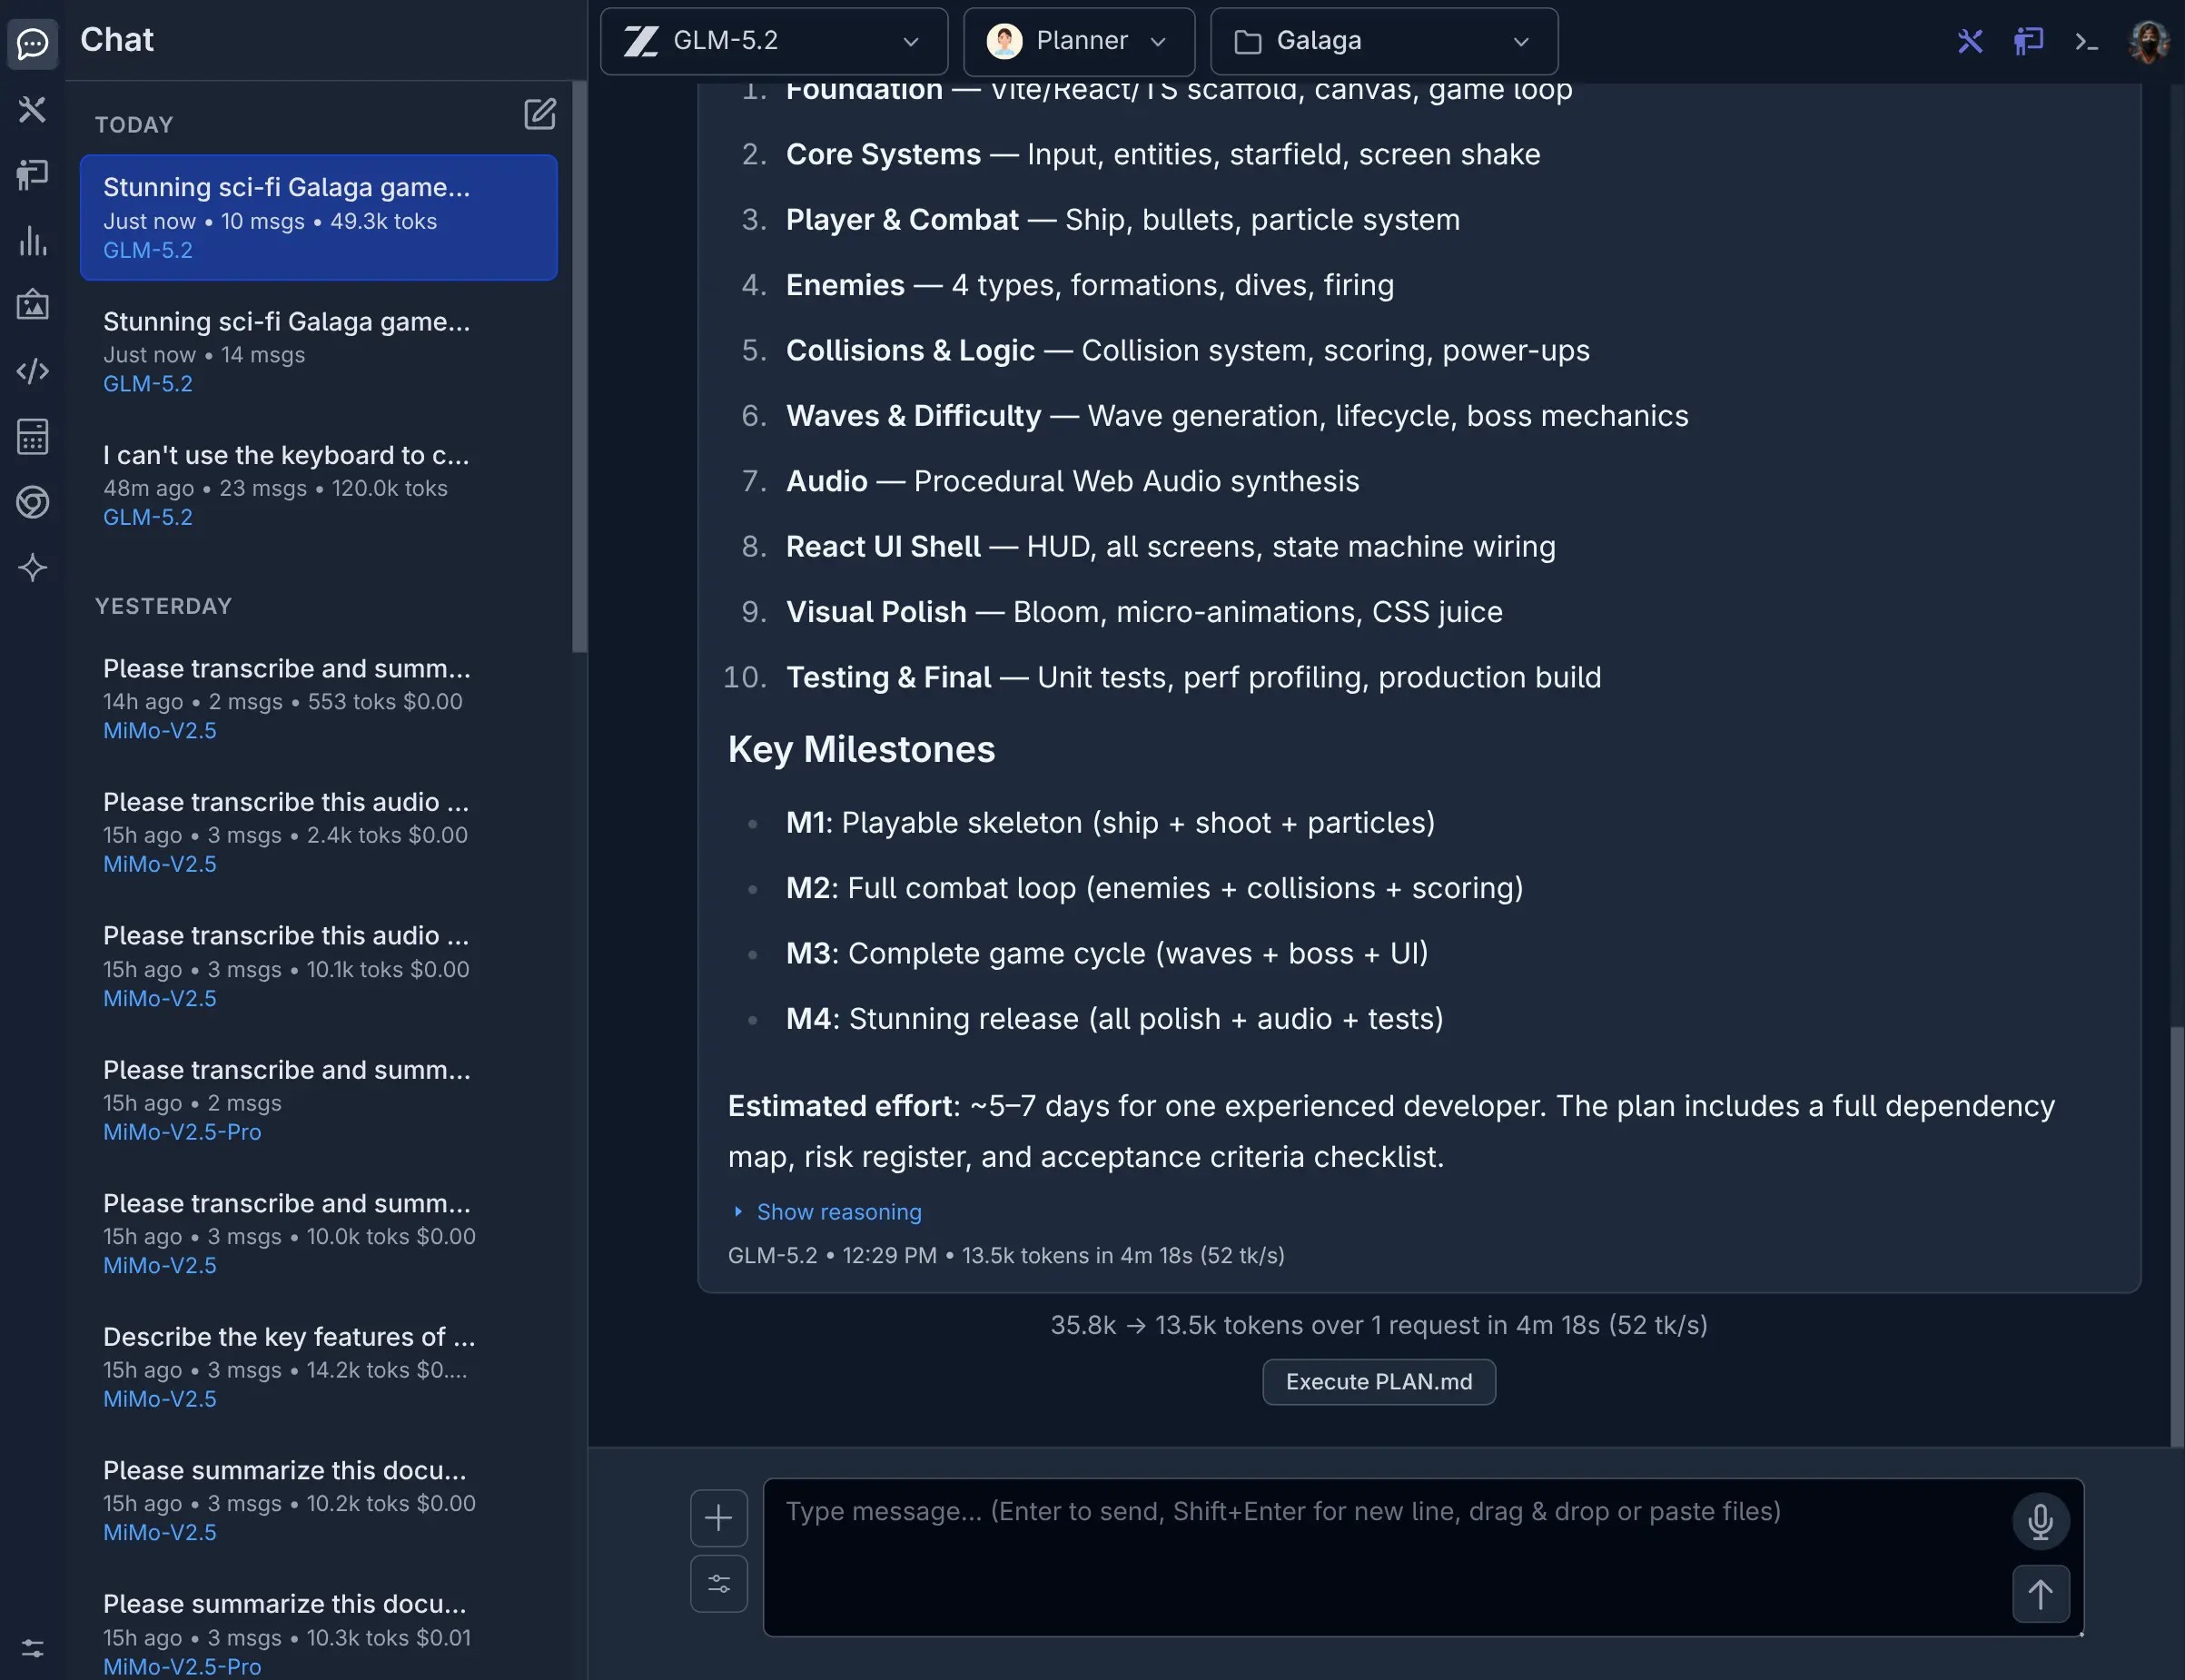
Planner
Click to view full size
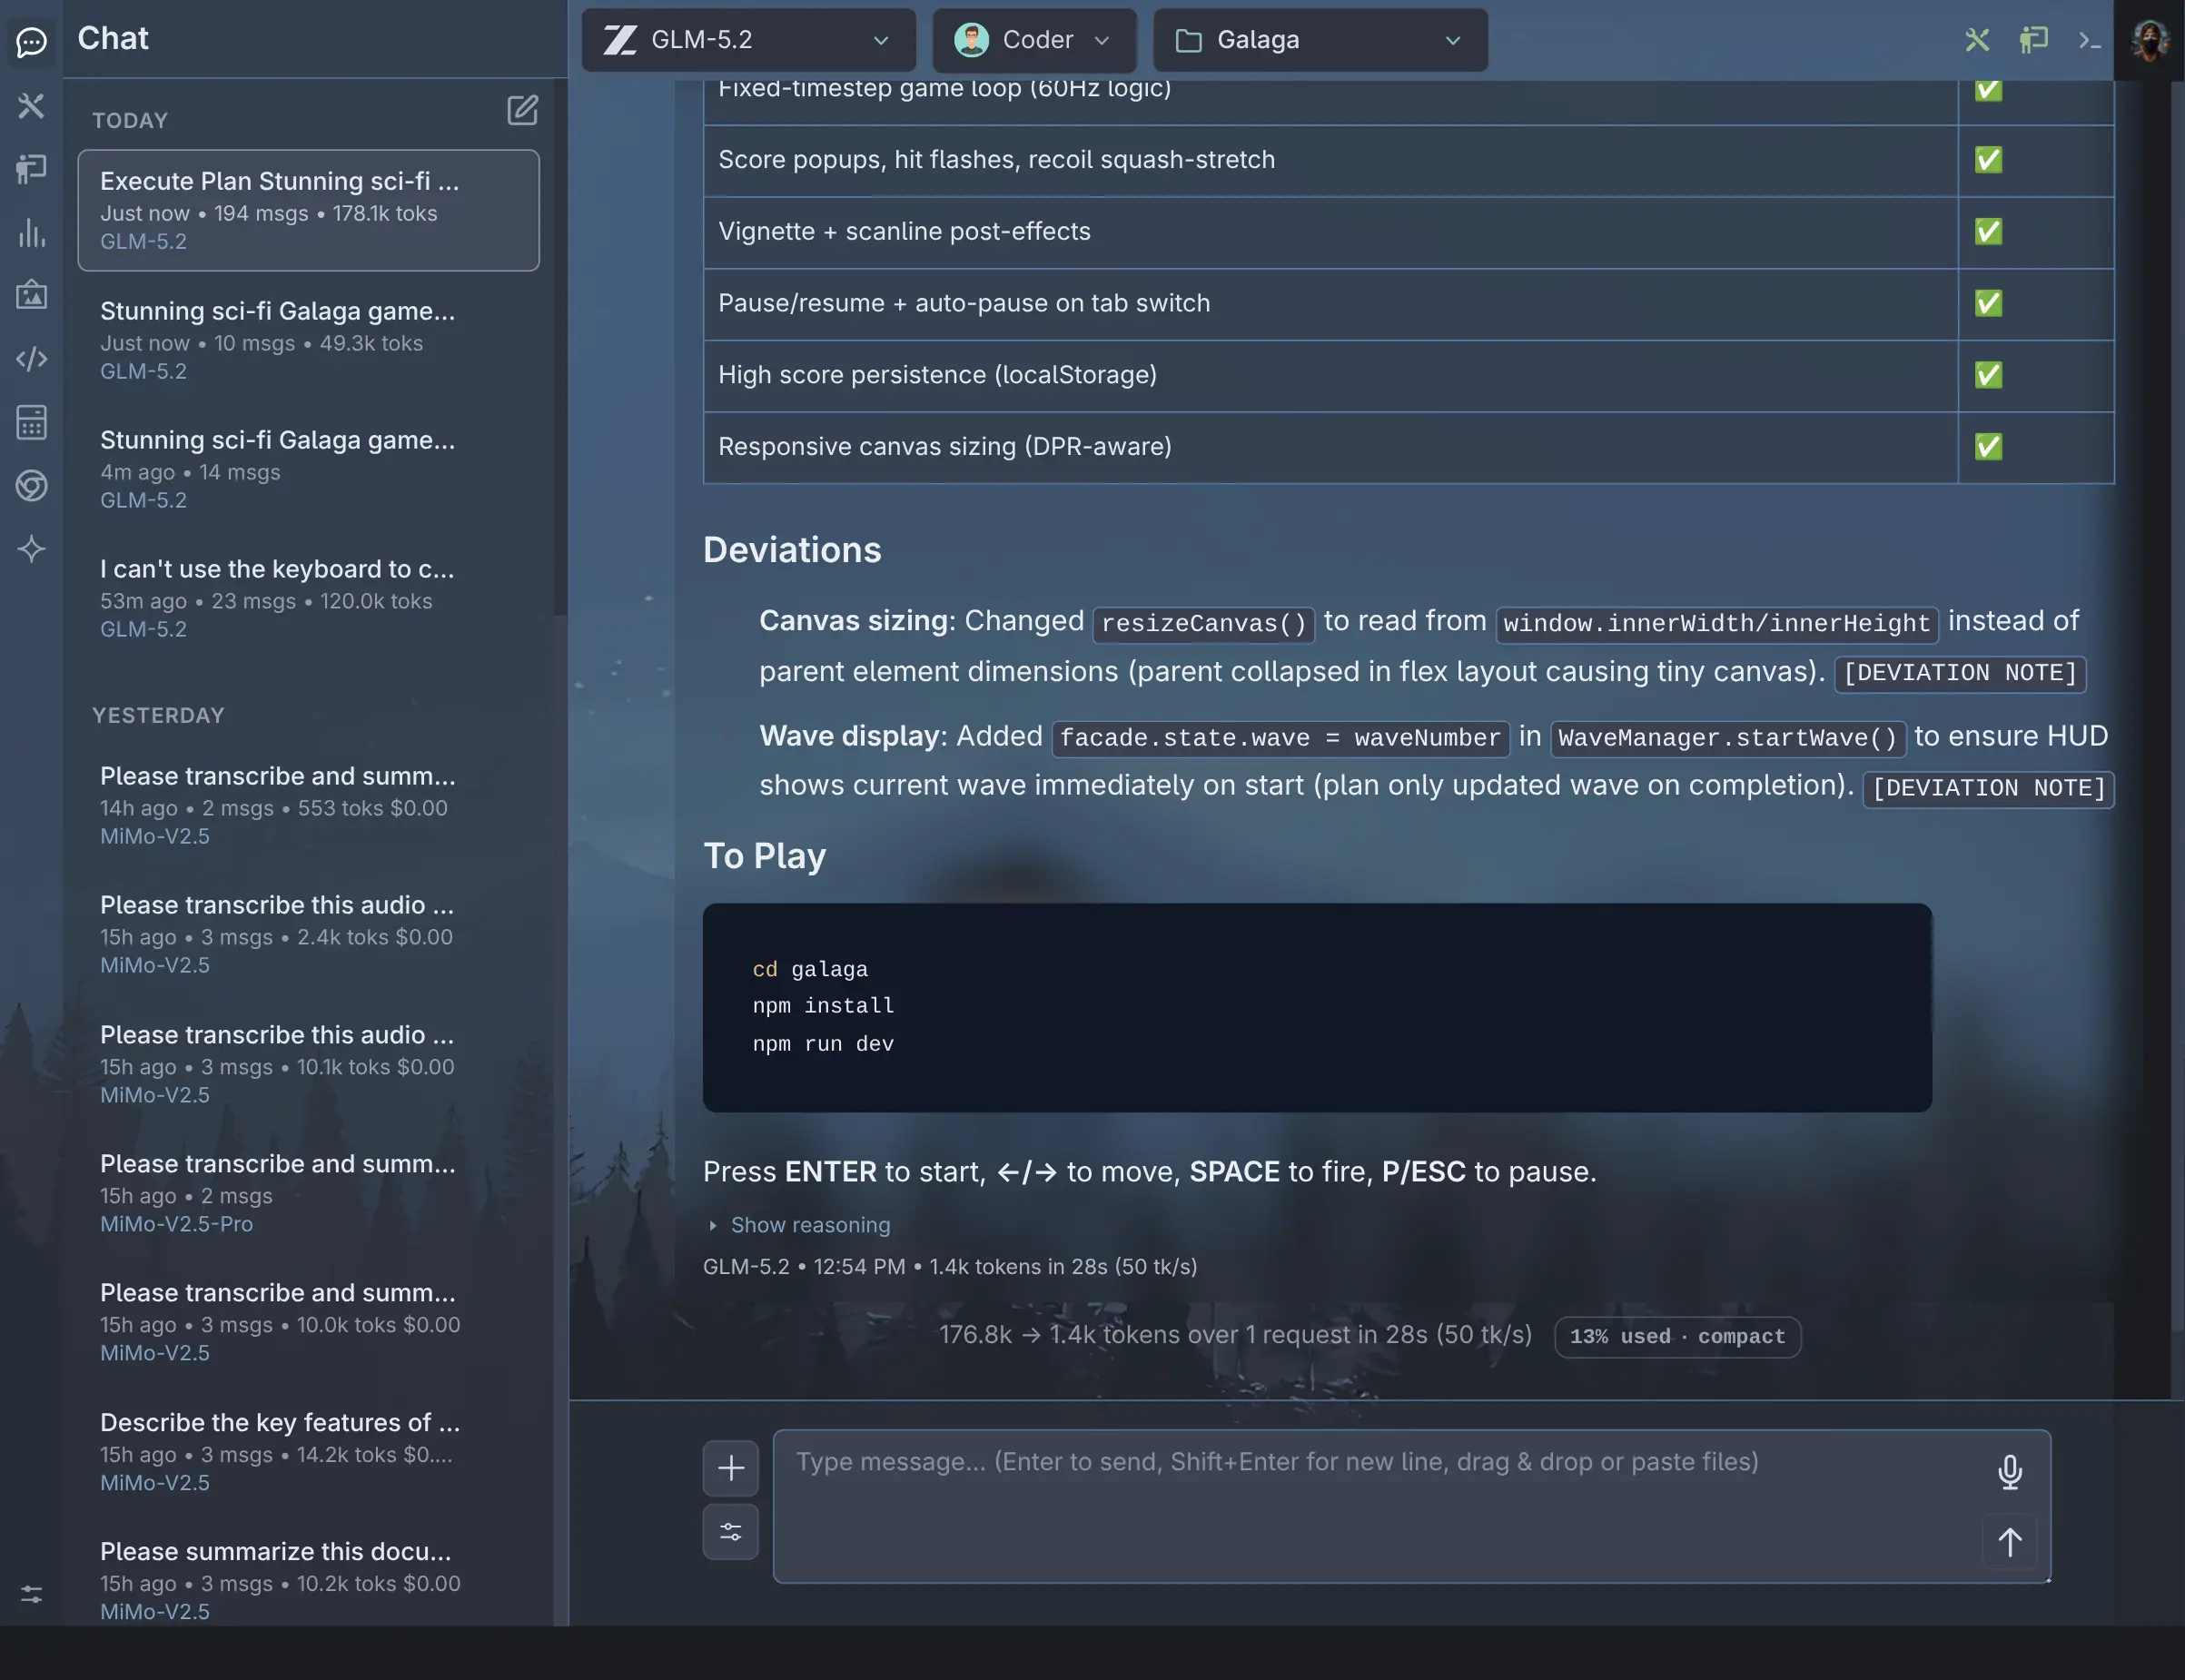
Coder
Click to view full size
Example: Sci-Fi GALAGA Game
The screenshots below show this workflow in action. The Planner was given the prompt "Build a Sci-Fi GALAGA game" and produced a full code architecture plan which was saved to PLAN.md. The Coder then read PLAN.md and implemented the complete game.
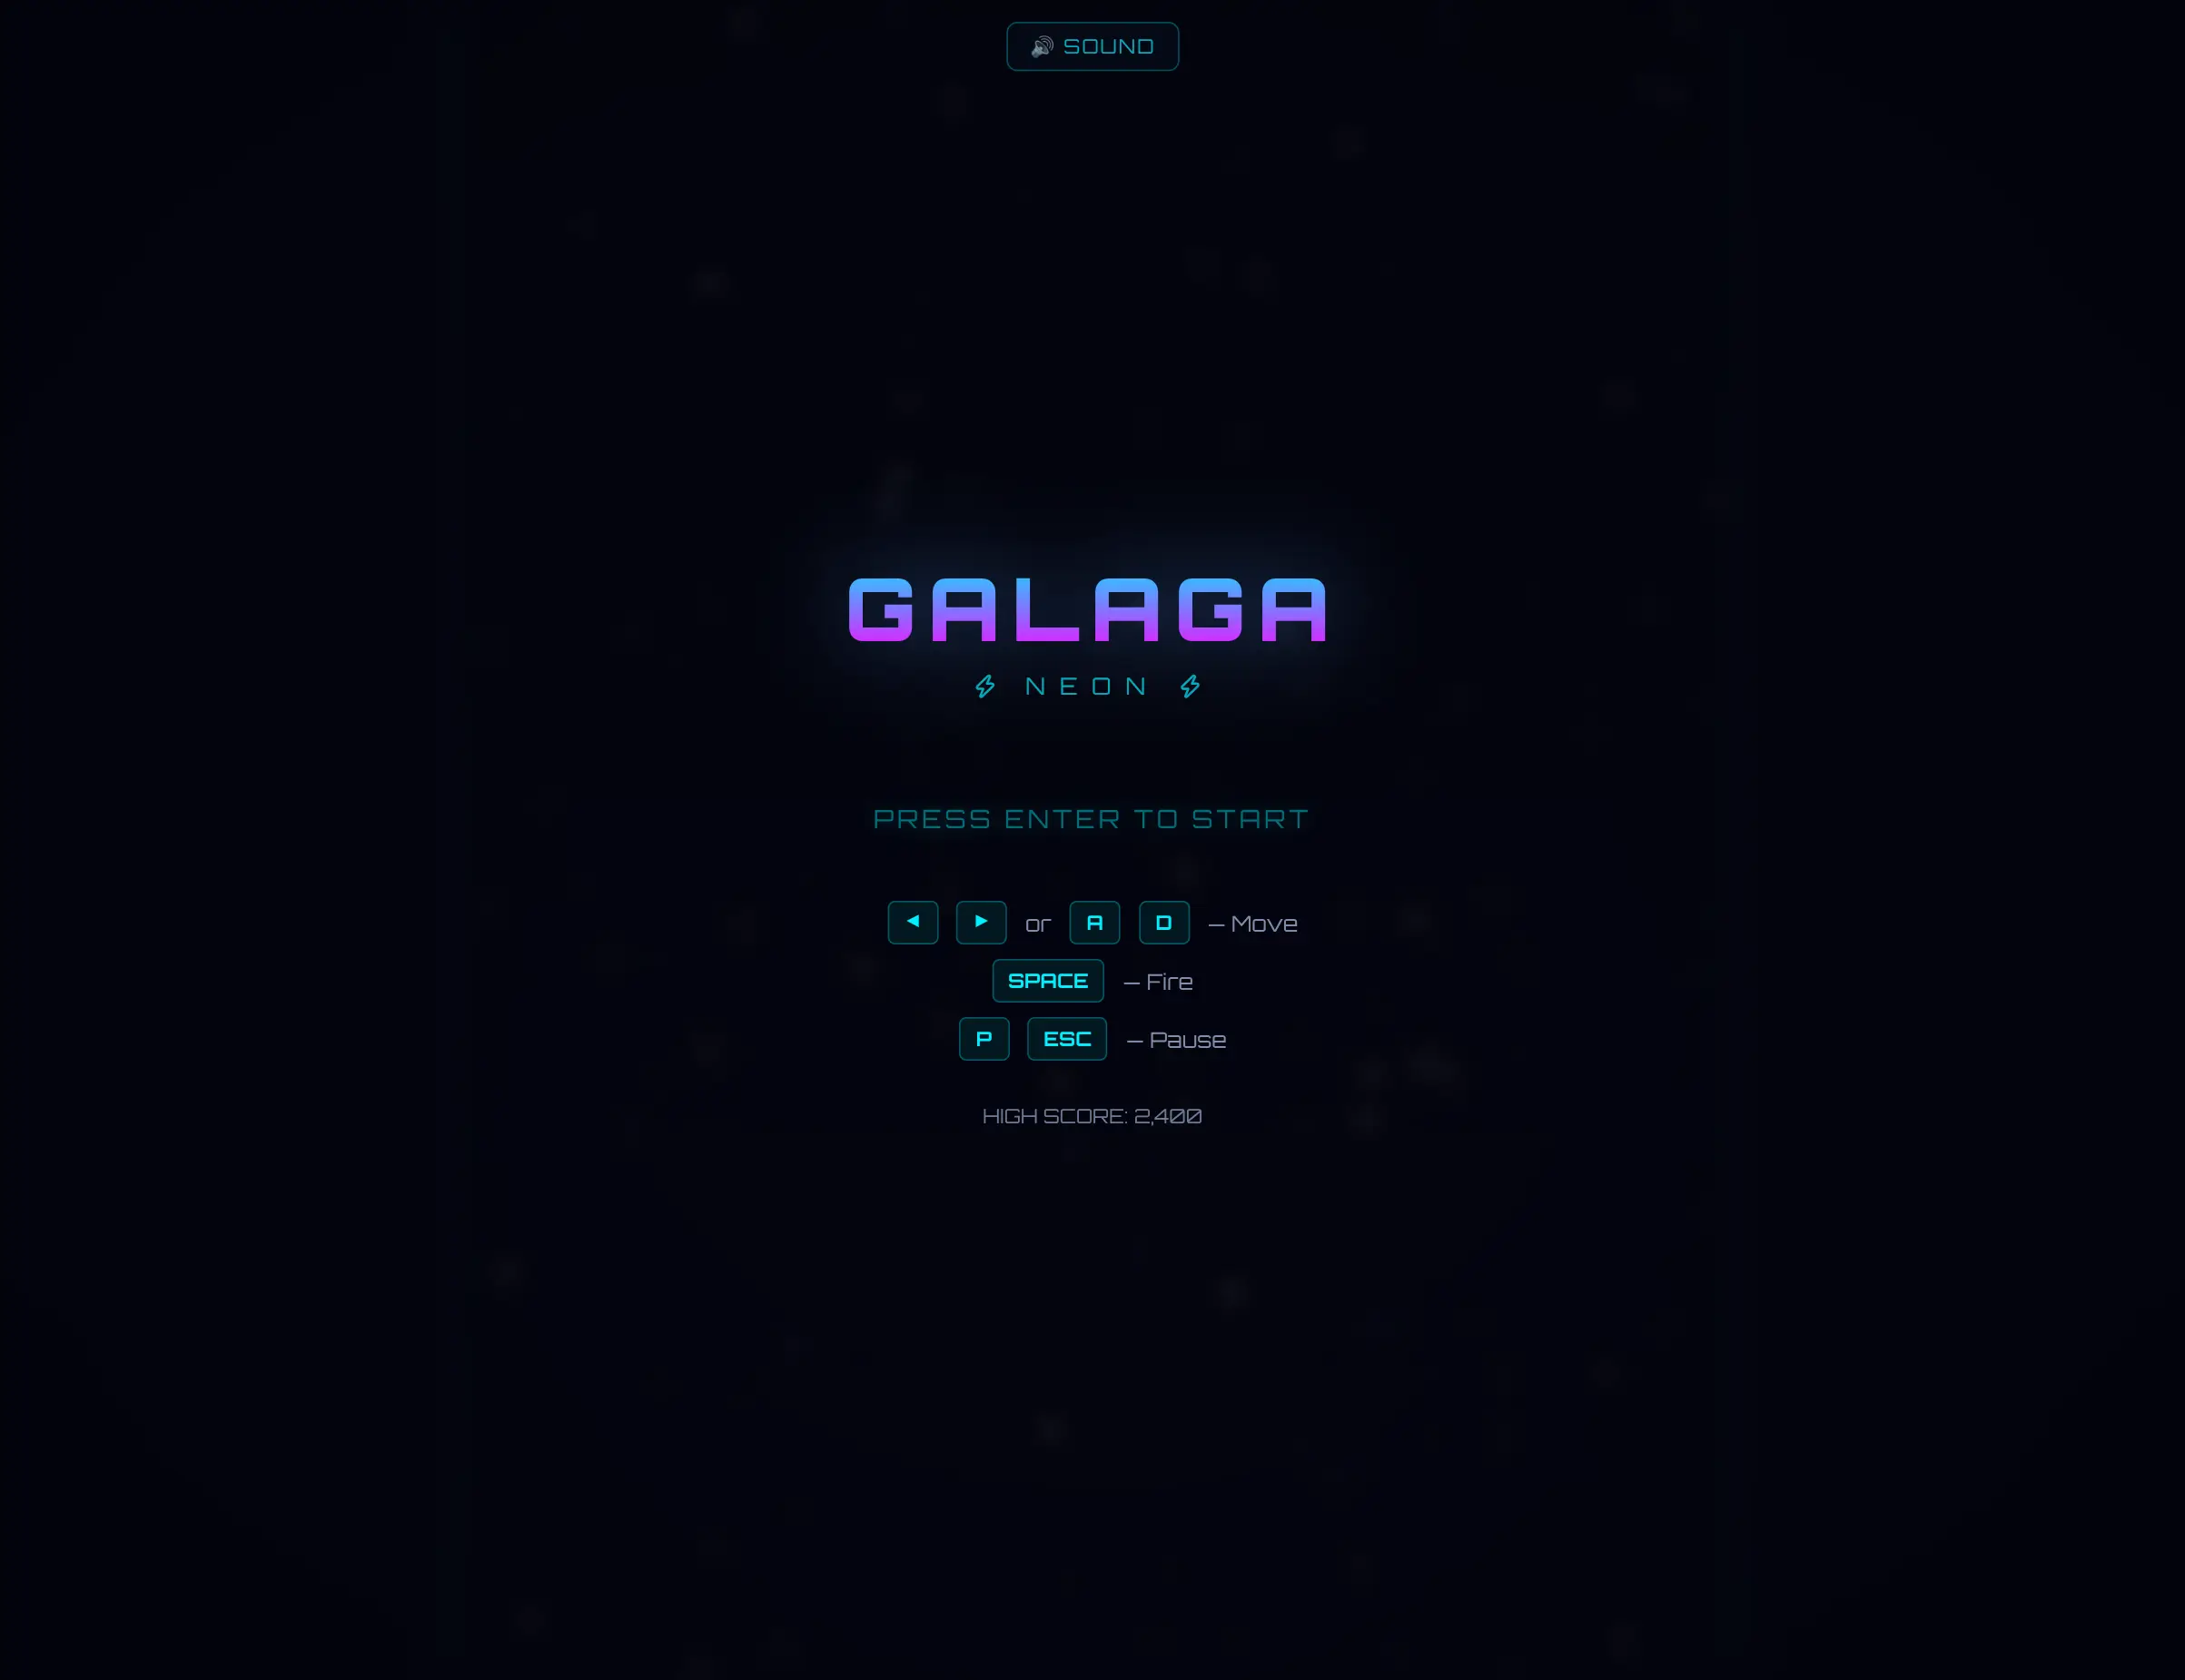
Galaga Menu
Click to view full size
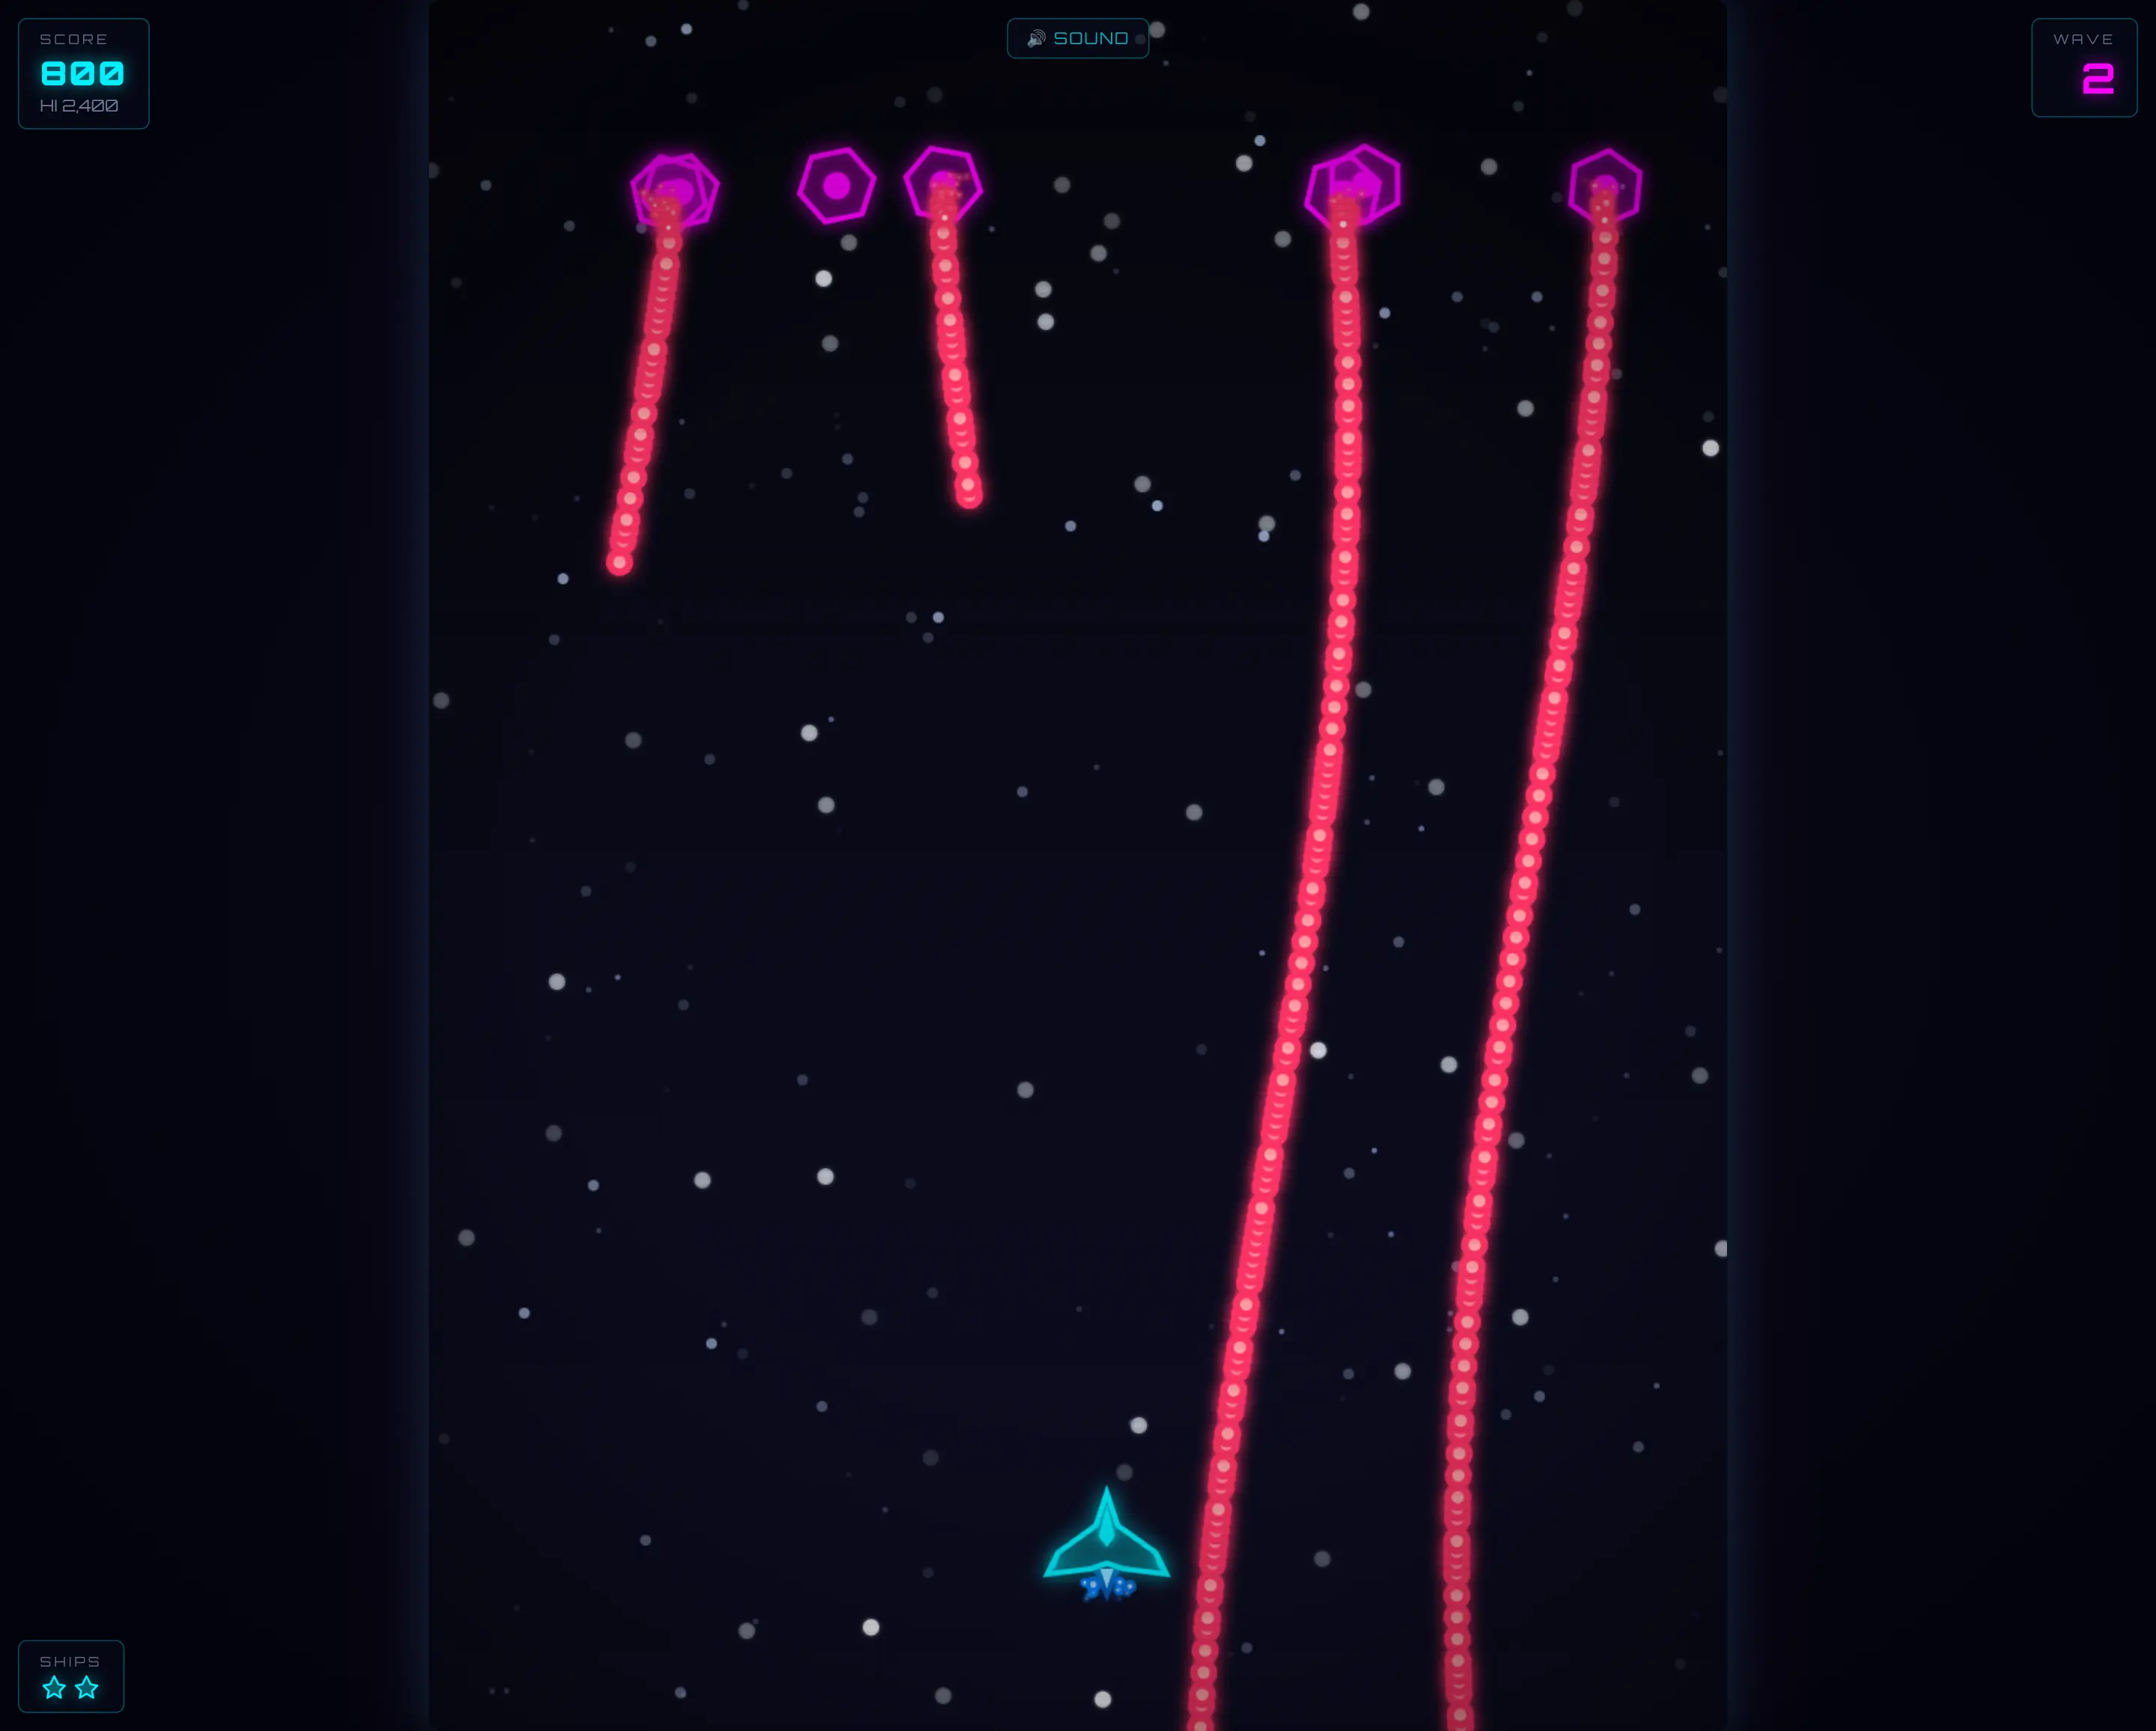
Galaga Game
Click to view full size
Profile Folder Structure
An agent profile is a subdirectory containing the following configuration and prompt files:
my-agent/
├── config.json          # Required: Defines agent preferences, tools, and actions
├── SYSTEM.md            # Required (or SYSTEM.template): Defines the system prompt
├── SYSTEM.template      # Optional: Text template for composite system prompts
└── avatar.png           # Optional: Agent's profile image (.png .webp .jpg .jpeg .svg)
Agent Configuration (config.json)
The config.json file controls the default preferences and restrictions of the agent.
Example Configuration
{
  "theme": "dark",
  "model": "Kimi K2.6",
  "onlyTools": [
    "get_current_time",
    "calc",
    "run_bash",
    "skill"
  ],
  "onlySkills": [],
  "actions": {
    "Execute Plan": {
      "profile": "coder"
    }
  }
}
Configuration Schema
| Field | Type | Required | Description |
|---|---|---|---|
name | string | No | A custom display name for the agent (defaults to the folder name capitalized). |
enabled | boolean | No | Defaults to true. Set to false to disable loading of the agent. |
theme | string | No | The theme to load when this agent is active (e.g. nord, dark, light_slate). |
model | string | No | The default LLM model to select when starting conversations with this agent. |
onlyTools | array | No | Restricts the tools the agent is permitted to use to the listed tool names. Set to [] to exclude all tools. If omitted (or null), all tools are allowed. |
onlySkills | array | No | Restricts the skills the agent is permitted to use to the listed skill names. Set to [] to exclude all skills. If omitted (or null), all skills are allowed. |
injectPrompt | boolean | No | Defaults to true. If set to false, the agent's system prompt will not be automatically prepended to the chat request. |
actions | object | No | Maps action names to buttons that appear in the chat footer under the assistant's responses (see Footer Actions below). |
Defining System Prompts
Agents support two methods for defining system prompts: simple prompts and composite templates.
1. Simple System Prompt (SYSTEM.md)
Create a SYSTEM.md file in the agent profile directory. The contents of this file are loaded directly as the system prompt.
2. Composite Prompt (SYSTEM.template)
For complex agents that benefit from dividing prompt logic across multiple files, use a SYSTEM.template file.
When a template is used, the system compiles the prompt using Python string formatting:
- Markdown Variables: Any
.mdfile placed inside the profile directory is read, and its content is mapped to a variable named after the file (without the.mdextension). For example, if you placeCODER.mdin the directory, you can reference it as{CODER}inSYSTEM.template.
Example SYSTEM.template
You are a helpful software engineering assistant.

{CODER}
Footer Actions
You can configure context-aware helper buttons to appear at the bottom of the chat view when the last message is from the assistant. Each action is defined as a key-value pair in the actions object, where the key is the button label displayed in the UI.
Action Properties
| Field | Type | Description |
|---|---|---|
message | string | A preset message sent to the current agent when the button is clicked. If omitted, the action's key (button label) is used as the message. |
profile | string | Switches the conversation to a different agent profile before executing. When set, the system starts a new thread using the target agent's system prompt. |
condition | object | Controls when the button is visible (see Conditional Visibility below). If omitted, the button is always shown. |
Action Types
Actions fall into two categories based on which properties are set:
1. Send Message Action
When only message is set (no profile), clicking the button sends the preset message to the current agent.
"Proceed": {
    "message": "Proceed with the execution"
}
2. Switch Profile and Execute Action
When profile is set, clicking the button transitions the conversation to a different agent. Specifically:
- The active agent switches to the designated profile (e.g.,
coder). - The system starts a new thread titled
Execute Plan {parent_thread_title}using the target agent's system prompt. - A user message with the action's key (e.g.,
Execute Plan) is automatically posted to trigger the new agent.
"Execute Plan": {
    "profile": "coder"
}
Conditional Visibility
When needed, actions can include a condition object that controls when the button is visible. This enables context-aware UIs where different buttons appear depending on the current state of the workspace.
| Field | Type | Description |
|---|---|---|
type | string | The condition type. Currently supports "file" for file-based conditions. |
glob | string | A glob pattern to match against files in the working directory (e.g., "PLAN.md", "*.json"). |
exists | boolean | When true, the button is shown only if a matching file exists. When false, the button is shown only if no matching file exists. |
Planner Profile Actions Example
The built-in planner profile uses three conditional actions that adapt the UI based on whether a PLAN.md file has been created:
"actions": {
    "Execute Plan": {
        "profile": "coder",
        "condition": {
            "type": "file",
            "glob": "PLAN.md",
            "exists": false
        }
    },
    "Save to PLAN.md": {
        "message": "Save to PLAN.md",
        "condition": {
            "type": "file",
            "glob": "PLAN.md",
            "exists": false
        }
    },
    "Execute PLAN.md": {
        "message": "Execute PLAN.md",
        "profile": "coder",
        "condition": {
            "type": "file",
            "glob": "PLAN.md",
            "exists": true
        }
    }
}
Before PLAN.md exists
When no PLAN.md file is present in the working directory, two buttons are shown:
| Button | Behavior |
|---|---|
| Execute Plan | Switches to the coder profile and starts a new thread to execute the plan from the conversation context directly — without saving it to a file first. |
| Save to PLAN.md | Sends the message "Save to PLAN.md" to the current planner agent, instructing it to persist the generated plan to a PLAN.md file in the working directory. |
After PLAN.md exists
Once a PLAN.md file has been saved, the above two buttons disappear and are replaced by:
| Button | Behavior |
|---|---|
| Execute PLAN.md | Sends the message "Execute PLAN.md" and switches to the coder profile, starting a new thread where the coder agent reads and executes the steps defined in the saved PLAN.md file. |
This pattern gives the user a two-phase workflow: plan first, then execute — with the option to either execute immediately from conversation context or persist the plan for review before execution.
Agent Avatars
To customize your agent's visual avatar, place an image file named avatar.<ext> in the agent's folder.
It supports common image formats including .png, .webp, .jpg, .jpeg, and .svg.
If no avatar image is found in the profile directory, the application falls back to the default SVG agent avatar.
Custom Personal Assistant Profile
The assistant example profile demonstrates how to build a fully personalized AI companion using SYSTEM.template and a custom avatar. It follows an Open Claw-inspired architecture that splits the system prompt into distinct conceptual sections, each in its own file.
Profile Structure
assistant/
├── config.json          # Agent name, theme, and model preferences
├── SYSTEM.template      # Composite template that assembles the prompt
├── IDENTITY.md          # Who the agent is — name, personality, voice
├── AGENTS.md            # Workspace rules, memory system, safety guidelines
├── USER.md              # Information about the human the agent is helping
├── SOUL.md              # Core values, boundaries, and behavioral principles
├── TOOLS.md             # Local environment notes (cameras, SSH hosts, etc.)
└── avatar.webp          # Custom profile image displayed in the chat UI
How the Template Works
The SYSTEM.template file composes the final system prompt by referencing each markdown file as a variable:
{IDENTITY}
{AGENTS}
{USER}
{TOOLS}
{SOUL}
At load time, the system reads every .md file in the profile directory and maps its contents to a template variable named after the file (without the .md extension). The template above produces a system prompt that concatenates all four sections in order, giving the agent a structured understanding of its identity, workspace conventions, the user it serves, and its core values.
Section Breakdown
| File | Purpose |
|---|---|
| IDENTITY.md | Defines the agent's name, creature description, personality traits, and voice. This is the agent's character sheet — who it is and how it presents itself. |
| AGENTS.md | The agent's operating manual. Covers session startup routines, the memory system (memory/ daily logs + MEMORY.md long-term memory), safety rules, tool usage patterns, and proactive behaviors like checking email and calendar. |
| USER.md | A living document about the human the agent assists — their name, timezone, projects, and repositories. The agent is encouraged to update this file as it learns more. |
| SOUL.md | The agent's value system. Defines core behavioral principles (be direct, think before speaking, earn trust), personality traits, communication boundaries, and voice guidelines. This file is designed to evolve as the agent develops. |
| TOOLS.md | A local scratchpad for environment-specific details — camera names, SSH aliases, TTS voice preferences. Kept separate from skills so it can be maintained independently. |
Configuration
The config.json sets the agent's display name, UI theme, and preferred model:
{
    "name": "Ubi",
    "theme": "soft_pink",
    "model": "Grok 4.3",
    "onlyTools": null,
    "onlySkills": null
}
Setting onlyTools and onlySkills to null gives the agent unrestricted access to all available tools and skills.
Custom Avatar
The profile includes a custom avatar.webp image that is displayed as the agent's profile picture in the chat UI, replacing the default SVG avatar. Any supported image format (.png, .webp, .jpg, .jpeg, .svg) can be used.
Creating Your Own
To create a personal assistant based on this pattern:
- Copy the
assistantexample to your user profiles directory:~/.llms/user/<user>/profiles/assistant - Edit
IDENTITY.mdto define your agent's name, personality, and voice - Update
USER.mdwith your own details, projects, and preferences - Customize
SOUL.mdto reflect the values and behavioral style you want - Adjust
AGENTS.mdfor your workspace conventions and memory preferences - Replace
avatar.webpwith your own agent avatar image - Update
config.jsonwith your preferred name, theme, and model