UI Extensions
This guide provides a walkthrough of the LLM UI Extensions API which allows you to customize the UI, add new pages, modify the layout, and intercept chat functionality.
We'll use the xmas extension as a practical example to explore the capabilities in the App Extensions API which starts from ctx.mjs.
Extension Entry Point
Every UI extension must export an object with an install(ctx) method. ctx is the AppContext instance which provides access to the core UI functionality.
let ext

export default {
    install(ctx) {
        // Manage state, stored prefs and API Integrations scoped to this ExtensionScope
        ext = ctx.scope('xmas')

        // Registration logic goes here
    },
    async load(ctx) {
        // Optional async loading logic
        // e.g., fetching initial data
    }
}
Registering Components
You can register custom Vue components to be used throughout the application or to replace existing ones. This is done using ctx.components().
Replacing Core Components
Overrides default Brand and Welcome components by registering components with the same name.
const Brand = {
    template: `
    <div class="flex-shrink-0 p-2 border-b border-gray-200 dark:border-gray-700 select-none">
        <button type="button" @click="$router.push('/')" class="...">
            🎄 {{ $state.title }} 🎄
        </button>
    </div>
    `,
}
const Welcome = {
    template: `<!-- Custom Welcome Screen -->`,
    setup() { /* ... */ }
}

export default {
    install(ctx) {
        ctx.components({
            // Replaces built-in UI Components
            Brand,
            Welcome,
            // Registers other custom components used in this UI Extension
            XmasPage,
            XmasTopPanel,
        })
    }
}
The result of which is a festive makeover with the Brand title on the top right, sporting Christmas trees, a modified home welcome screen with a random assortment of Christmas emojis and links to Xmas extension page and top panel features:

Full Example Component: Top Panel
This is how you define a complex UI component like a Top Panel. It's just a standard Vue 3 component.
const XmasTopPanel = {
    template: `
        <div class="w-full bg-red-800 ...">
             <!-- Panel Content -->
             <h1>Ask Santa</h1>
             <p>Chat directly with Santa Claus...</p>
        </div>
    `,
    setup() {
        return {
            // ... setup logic
        }
    }
}
Adding Navigation Icons
Left Sidebar Icons
Use ctx.setLeftIcons(icons) to add icons to the left sidebar.
component: The Vue component for the icon button.isActive: A function receiving layout parts like{ path }to determine active state.
ctx.setLeftIcons({
    xmas: {
        component: {
            template: `<button @click="$ctx.togglePath('/xmas')" class="...">🎄</button>`
        },
        isActive({ path }) { return path === '/xmas' }
    }
})
Adding New Pages & Routes
You can push new route definitions directly to ctx.routes.
const XmasPage = {
    template: `...`
}

ctx.routes.push({
    path: '/xmas',
    component: XmasPage,
    meta: { title: `Merry Christmas!` }
})
Which results in a new /xmas page accessible via the left sidebar icon:
Top Bar Icons
Use ctx.setTopIcons(icons) to add icons to the top navigation bar.
-
component- The Vue component for the icon button. -
isActive- A function receiving layout parts like{ top }to determine active state.
ctx.setTopIcons({
    xmas: {
        component: {
            template: `<button @click="toggle" class="...">🎁</button>`,
            setup() {
                const ctx = inject('ctx')
                async function toggle() {
                     // Toggles the Top Panel named 'XmasTopPanel'
                    if (ctx.toggleTop('XmasTopPanel')) {
                        // Start a new thread when opened
                        ctx.threads.startNewThread({ title: 'Ask Santa' })
                    }
                }
                return { toggle }
            }
        },
        isActive({ top }) {
            return top === 'XmasTopPanel'
        }
    }
})
Which results in opening a festive Top Panel when clicked that opens a direct line to Santa Claus by way of adding a custom system prompt to new chat requests when its top panel is open:

Smart generation models like Nano Banana's gemini-2.5-flash-image perform exceptionally well here as they're able to answer your kids questions with rich, detailed responses and image outputs.
Chat & Thread Integration
The xmas extension achieves this by intercepting chat requests and injecting a Santa system prompt to modify the chat behavior to create custom Santa persona.
Thread Creation Filters
Use ctx.createThreadFilters to modify new Chat threads as they are created.
const santaSystemPrompt = `You are Santa Claus...`
const isTopOpen = () => ctx.layout.top === 'XmasTopPanel'

ctx.createThreadFilters.push(thread => {
    // Only save custom system prompt if our specific UI panel is open
    if (!isTopOpen()) return
    thread.systemPrompt = santaSystemPrompt
})
This attaches the Santa system prompt to the new thread which will include it in all subsequent chat requests for that thread.
Chat Request Filters
Use ctx.chatRequestFilters to modify the request body before it is sent to the LLM.
ctx.chatRequestFilters.push(({ request, thread }) => {
    if (!isTopOpen()) return

    // Use Santa's system prompt for every request when XmasTopPanel is open
    request.messages = request.messages.filter(x => x.role !== 'system')
    request.messages.unshift({
        role: 'system',
        content: santaSystemPrompt
    })
})
Controlling Layout & Logic
Router Hooks
Intercept navigation changes using ctx.onRouterBeforeEach. This is useful for managing UI state based on the current page.
// Auto hide top panel on non-chat pages
ctx.onRouterBeforeEach((to, from) => {
    if (to.path !== '/' && !to.path.startsWith('/c/')) {
        ctx.toggleTop('XmasTopPanel', false)
    }
})
Styling Interception
Use ctx.onClass to dynamically modify CSS classes for layout elements (like body or page).
ctx.onClass((id, cls) => {
    // Only apply custom styles on the home page
    if (ctx.router.currentRoute.value?.path !== '/') return

    // Add festive background colors to the page container
    if (id == 'page') {
        return cls + ' bg-slate-50! dark:bg-slate-950!'
    }
})
Backend Integration
Extension Scope
Use ctx.scope(id) to create a scoped helper for standard API interactions that's scoped to the extension allowing you to use /path to access extension APIs that are prefixed at /ext/{extension}.
// Scope for 'xmas' extension
let ext

export default {
    install(ctx) {
        ext = ctx.scope('xmas')  // create extension scope
        //...
    },

    async load(ctx) {
        // GET /ext/xmas/greetings.json
        const api = await ext.getJson("/greetings.json")

        const greetings = api.response
        if (greetings) {
            // maintain in local reactive state in (localized to extension)
            ext.setState({ greetings })

            // maintain in global reactive state
            ctx.setState({ greetings })
        } else {
            ctx.setError(api.error)
        }
    }
}
fetch APIs
The get, delete, post, put, patch and postForm methods return fetch responses.
JSON ApiResult APIs
All *Json API variants (e.g. getJson, postJson) automatically parse JSON responses and return standardized ApiResult which either returns successful JSON responses in api.response or errors in api.error.
POST HTML Forms
Example of using standard HTML Forms to call an Extension's Server API.
<form @submit.prevent="onSubmit" class="...">
    <input name="name" v-model="ext.prefs.name" .../>
    <button type="submit" class="...">
        Greet
    </button>
</form>
Use Extension prefs for maintaining extension state that you would like to persist to localStorage at llms.<scope>, e.g. llms.xmas. By default it returns an empty {} reactive object that your input components can bind to directly.
Call ext.savePrefs() to save the current prefs to localStorage. There's also ext.setPrefs({ ... }) to populate the prefs with additional info before saving.
Submit a HTML Form with:
ext.postForm(path, {
    body: new FormData(e.target)
})
Which POST's all the HTML Form's Input values to /ext/xmas/greet as multipart/form-data
async function onSubmit(e) {
generateStory()
ext.savePrefs() // saves {"name":"..."} to localStorage['llms.xmas']
const form = new FormData(e.target)
// POST /ext/xmas/greet (multipart/form-data)
const res = await ext.postForm('/greet', {
body: form
})
try {
result.value = (await res.json()).result
} catch (e) {
result.value = `${e}`
}
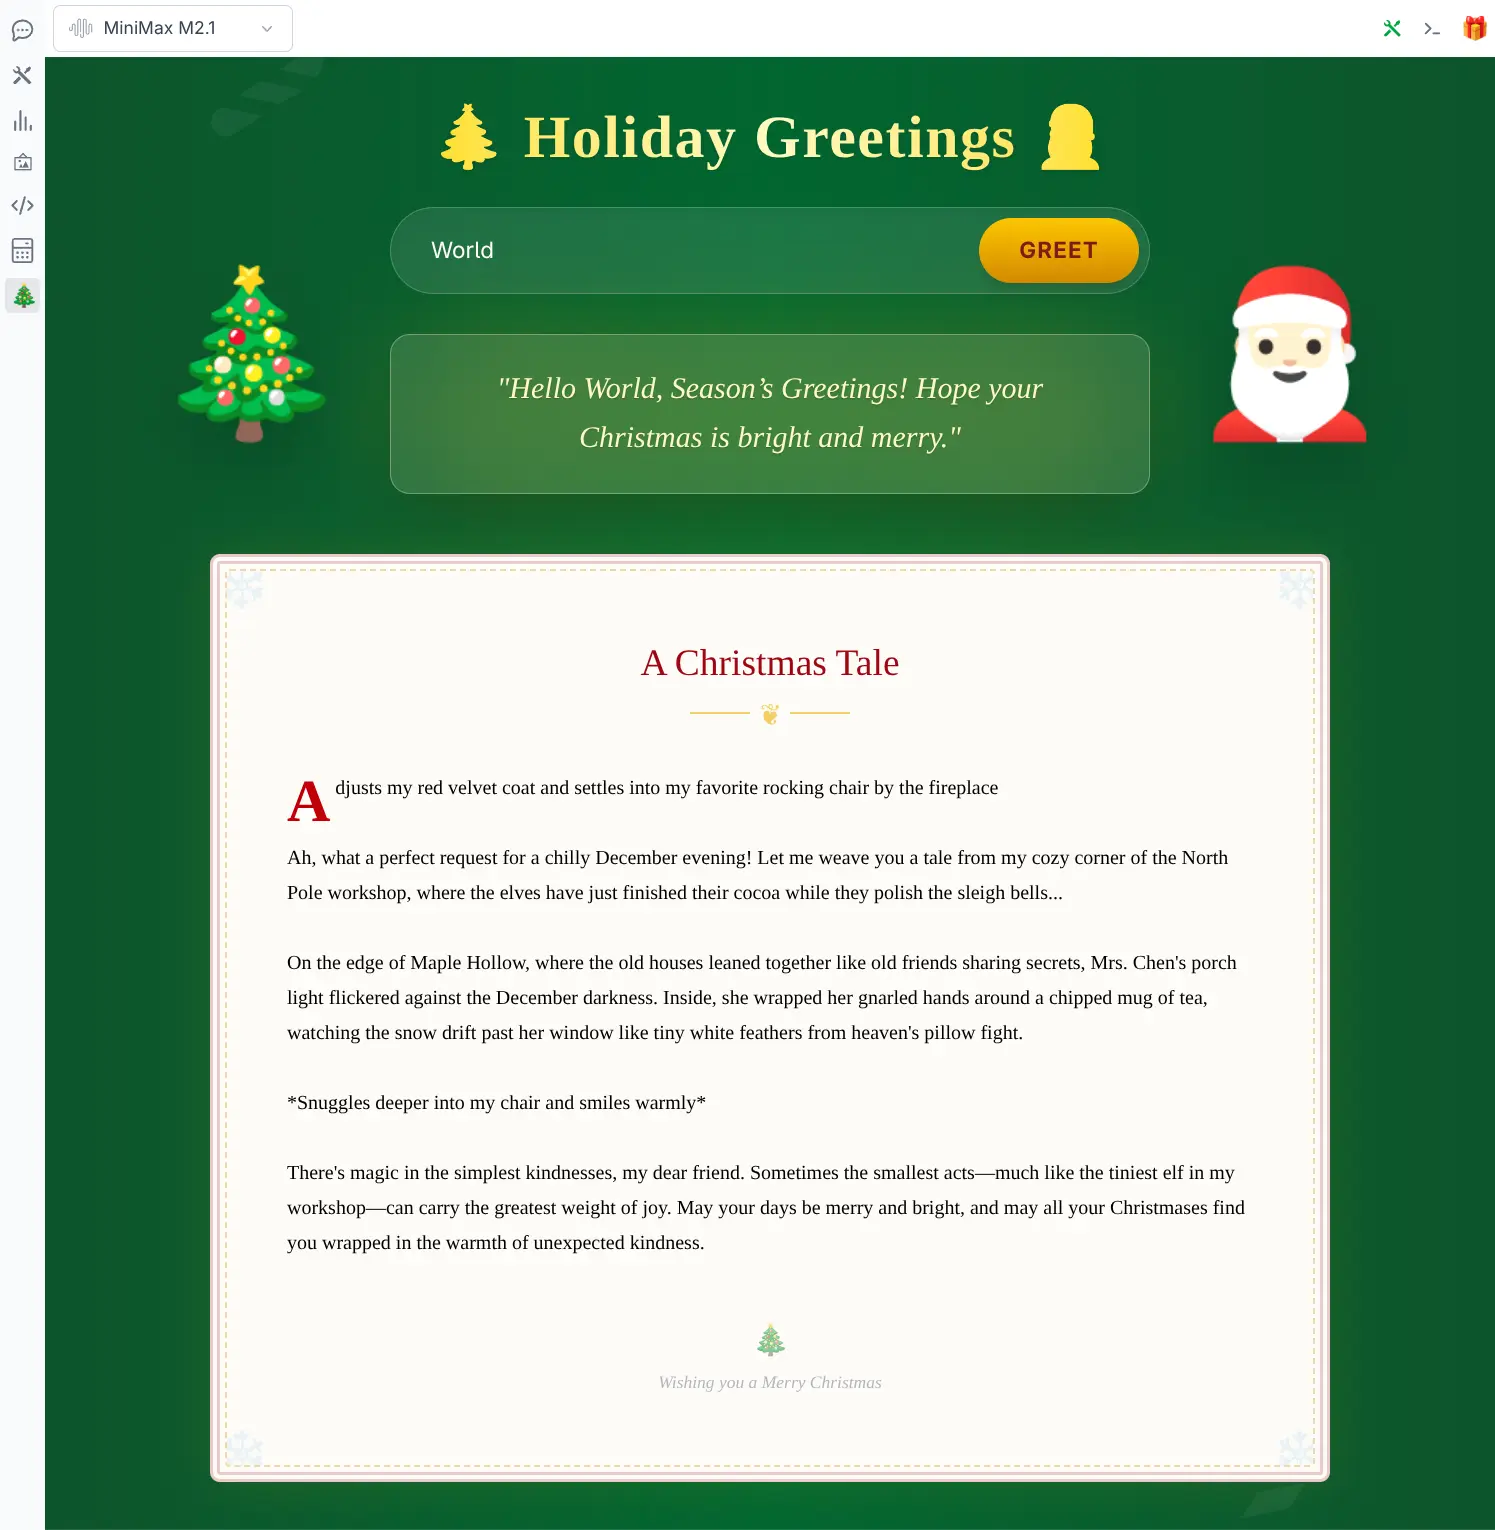
}This calls the extensions server endpoint to return the next Christmas Greeting:
count = 0
async def greet(request):
    nonlocal count
    data = await request.post()
    name = data.get('name')
    greeting = greetings[count % len(greetings)]
    count += 1
    return web.json_response({"result":f"Hello {name}, {greeting}"})

ctx.add_post("greet", greet)
Programmatic Chat Completions
You can use the chat API within your components to generate text using the configured LLMs. This is useful for creating dynamic content like stories, summaries, or finding information.
Example: Generating a Story
The XmasPage component uses ctx.chat.completion to generate a Christmas story on load.
async function generateStory() {
    const freeStoryModelNames = ['Kimi K2 0905', 'Kimi K2 Instruct', 'Kimi K2 (free)', 'Kimi Dev 72b (free)', 'GPT OSS 120B']
    const availableStoryModel = freeStoryModelNames.map(name => ctx.chat.getModel(name)).find(x => !!x)
    if (!availableStoryModel) {
        console.log('No story models available')
        return
    }
    ext.state.story = `Santa begins to tell you a christmas story...`
    const request = ctx.chat.createRequest({
        model: availableStoryModel,
        text: `Write a short, feel-good Christmas story set on a quiet winter evening. Focus on simple kindness, cozy details, and gentle magic—twinkling lights, warm drinks, falling snow, and a small act of generosity that brings people together. Keep the tone hopeful and comforting, with a soft, joyful ending that leaves the reader smiling.`,
        systemPrompt: santaSystemPrompt,
    })
    const api = await ctx.chat.completion({
        request
    })
    if (api.response) {
        ext.state.story = ctx.chat.getAnswer(api.response)
    } else if (api.error) {
        ext.state.story = api.error.message
    }
}

onMounted(() => {
    if (!ext.state.story) {
        generateStory()
    }
})
Making AI Requests
There are 2 APIs to make API calls:
Synchronous API
To make a synchronous chat completion request use:
await ctx.chat.completion({ request, thread })This makes a standard chat completion request that doesn't return until the full response is received.
Asynchronous API
To start a new Chat Thread use:
await ctx.threads.startNewThread({ title, model, redirect })Which creates and returns a new empty Thread in the Server, if redirect:true also navigates the UI to the new thread page.
Then to begin processing an asynchronous chat completion request use:
await ctx.threads.queueChat({ request, thread })This starts a background thread on the server to process the chat request and returns immediately with the updated thread containing the pending user message.
When viewing an incomplete (i.e. pending thread) thread, the UI automatically polls for updates to the thread and displays the updated response as they arrive.
Args
request: The OpenAI chat request object{ model, messages, temperature, ... }thread: The chat thread object.
UI Extensions API
The UI Extensions API starts from AppContext which is available via the ctx singleton provider. An extension-scoped API can be created with ext = ctx.scope(extensionName).
The ctx object provides access to the application state, routing, AI client, formatting utilities, and UI layout controls. It is globally available in Vue components as $ctx and can be imported in other modules.
AppContext
The global application context, typically accessed as ctx.
Properties
| Property | Type | Description |
|---|---|---|
app | Vue.App | The Vue application instance. |
routes | Object | Access to application routes. |
ai | JsonApiClient | The configured AI client for making API requests. |
fmt | Object | Formatting utilities (e.g., date formats, currency). |
utils | Object | General utility functions. |
state | Object (Reactive) | Global reactive state object. |
events | EventBus | Event bus for publishing and subscribing to global events. |
prefs | Object (Reactive) | User preferences, persisted to local storage. |
layout | Object (Reactive) | UI layout configuration (e.g., visibility of sidebars). |
Global Helpers (Vue)
These properties are available globally in Vue templates and components:
$ctx: TheAppContextinstance.$prefs: Alias forctx.prefs.$state: Alias forctx.state.$layout: Alias forctx.layout.$ai: Alias forctx.ai.$fmt: Alias forctx.fmt.$utils: Alias forctx.utils.
Methods
scope(extensionName)
Creates an extension-scoped context.
- extensionName:
string- Unique identifier for the extension. - Returns:
ExtensionScope
getPrefs()
Returns the reactive preferences object.
setPrefs(prefs)
Updates the user preferences.
- prefs:
Object- Partial preferences object to merge.
setState(state)
Updates the global state.
- state:
Object- Partial state object to merge.
setError(error, msg?)
Sets a global error state.
- error:
Error- The error object. - msg:
string(Optional) - Contextual message.
clearError()
Clears the global error state.
toast(msg)
Displays a toast notification.
- msg:
string- Message to display.
to(route)
Navigates to a specific route.
- route:
string | Object- The route path or route object.
Layout & UI Methods
setTopIcons(icons)
Registers icons for the top header bar.
- icons:
Object- Map of icon definitions.
setLeftIcons(icons)
Registers icons for the left sidebar.
- icons:
Object- Map of icon definitions.
component(name, component?)
Registers or retrieves a global component.
- name:
string- Component name. - component:
Component(Optional) - Vue component to register.
components(components)
Registers multiple components at once.
- components:
Object- Map of component names to Vue components.
modals(modals)
Registers modal components.
- modals:
Object- Map of modal names to components.
openModal(name)
Opens a registered modal.
- name:
string- Name of the modal to open. - Returns:
Component- The modal component instance.
closeModal(name)
Closes a specific modal.
- name:
string- Name of the modal to close.
toggleLayout(key, toggle?)
Toggles visibility of a layout element.
- key:
string- Layout key (e.g., 'left', 'right'). - toggle:
boolean(Optional) - Force specific state.
layoutVisible(key)
Checks if a layout element is visible.
- key:
string - Returns:
boolean
toggleTop(name, toggle?)
Toggles the active top view.
- name:
string- Name of the top view. - toggle:
boolean(Optional) - Force specific state.
togglePath(path, toggle?)
Toggles navigation to a specific path, typically used for sidebar toggles.
- path:
string- URL path. - toggle:
boolean(Optional) - Force specific state.
HTTP Methods -> fetch Response
get(url, options)delete(url, options)post(url, options)put(url, options)patch(url, options)postForm(url, options)
HTTP JSON Methods -> ApiResult(response | error)
getJson(url, options)deleteJson(url, options)postJson(url, options)putJson(url, options)patchJson(url, options)
ExtensionScope
Returned by ctx.scope(name). Provides utilities scoped to a specific extension, including scoped local storage, error handling, and API endpoints.
Properties
| Property | Type | Description |
|---|---|---|
id | string | Extension ID/Name. |
ctx | AppContext | Reference to the parent context. |
baseUrl | string | Base URL for extension API requests (/api/ext/{id}). |
storageKey | string | Key prefix for local storage (llms.{id}). |
state | Object (Reactive) | Local reactive state for the extension. |
prefs | Object (Reactive) | Scoped preferences, persisted to llms.{id}. |
Methods
getPrefs()
Returns the extension's reactive preferences.
setPrefs(prefs)
Updates and saves the extension's preferences.
- prefs:
Object- Partial object to merge.
savePrefs()
Force saves the current preferences to local storage.
setError(e, msg?)
Sets an error found within the extension. Automatically prefixes the message with the extension ID.
- e:
Error - msg:
string(Optional)
clearError()
Clears the global error.
toast(msg)
Displays a toast notification.
Scoped HTTP Methods
These methods automatically prepend the extension's baseUrl to the request URL.
get(url, options)
Makes a raw GET request relative to the extension's base URL.
getJson(url, options)
Makes a GET request expecting JSON relative to the extension's base URL.
post(url, options)
Makes a raw POST request relative to the extension's base URL.
postJson(url, body)
Makes a POST request sending JSON data.
- url:
string - body:
Object | FormData
postForm(url, options)
Makes a POST request with form data.
post(url, options)
Makes a raw PUT request relative to the extension's base URL.
putJson(url, body)
Makes a PUT request sending JSON data.
patch(url, options)
Makes a raw PATCH request relative to the extension's base URL.
patchJson(url, body)
Makes a PATCH request sending JSON data.
delete(url, options)
Makes a DELETE request.
deleteJson(url, options)
Makes a DELETE request expecting JSON response.
createJsonResult(res)
Helper to create a standardized JSON result object from a response.
createErrorResult(e)
Helper to create a standardized error result object from an exception.